How to Set Up Email Newsletters in Ghost (Self-Hosted)
Learn how to set up professional email newsletters in Ghost using Mailgun, custom domains, and proper server configuration. Step-by-step guide included.

Publishing online isn’t just about writing—it’s about reaching your audience where they are: their inbox. Newsletters remain one of the most powerful tools for creators. With Ghost, you don’t need external tools to make that happen. And especially since Ghost v5.126.0, you can even customize the look and feel of your emails to a great extent.
But first things first. Once you get your server up and running, how do you set up newsletters? Here’s how to set it all up, step by step.
Step 1: Set Up a Professional Email Address
Firstly, if you want to look professional online, you'll need an email with your domain.
You have several options:
- Zoho, which is 100% free with upgradable plans. The downside is you can only use their online email client, but more than enough to start out. You'll just need to configure your DNS records (in Digital Ocean if you followed this guide 100%) according to their instructions, which are very straight forward.
- If you're an iCloud subscriber, you can add an email with a custom domain to your iCloud plan. A way to save some money and have a reliable email provider. Again, configure DNS settings according to Apple's instructions.
- Use any of the professional email providers. Google, Microsoft, Proton...to name a few. Research for different offers and decide what you need. But remember, it's just an email you need, not a lot more.
Step 2: Create a Mailgun Account
Ghost itself can't send emails for you if you host it on Digital Ocean. It needs a 3rd party service, a plugin if you like, to handle sending emails. The most straight-forward way to do this is by using Mailgun. Their plans are very accessible (if not free), especially for starting out.
This is how you do it:
- Create a Mailgun account.
- Add your domain using the "Domains" link in the menu. They recommend you use a subdomain starting with
mgwhich means you type inmg.yourdomain.com. - Configure your DNS records as they instruct in their guide. Make sure that everything propagates.
- You're done!
Step 3: Connect Mailgun to Ghost
Now we just have to connect Mailgun with Ghost.
- Log into Ghost admin. Go to settings and select "Newsletters".
- You will see a section dedicated to Mailgun, where you can select your region (depends on what you chose when adding a domain in Mailgun) and also add your Mailgun domain (
mg.yourdomain.com).
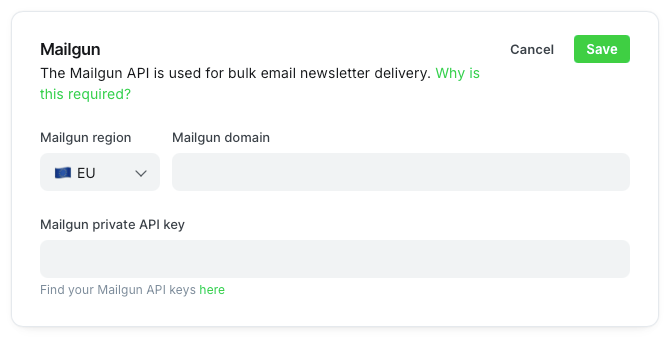
- Now copy and paste your Mailgun private API key in the dedicated input field. Either click on the link provided by Ghost or navigate to API Security in the Mailgun profile dropdown.
- The rest of what you need to do in Ghost is create a newsletter and design it.
Step 4: Update Your Server Configuration
Before you actually start sending emails, you need to do a quick server configuration. Specifically, a file called config.production.json located in the toot of your Ghost directory.
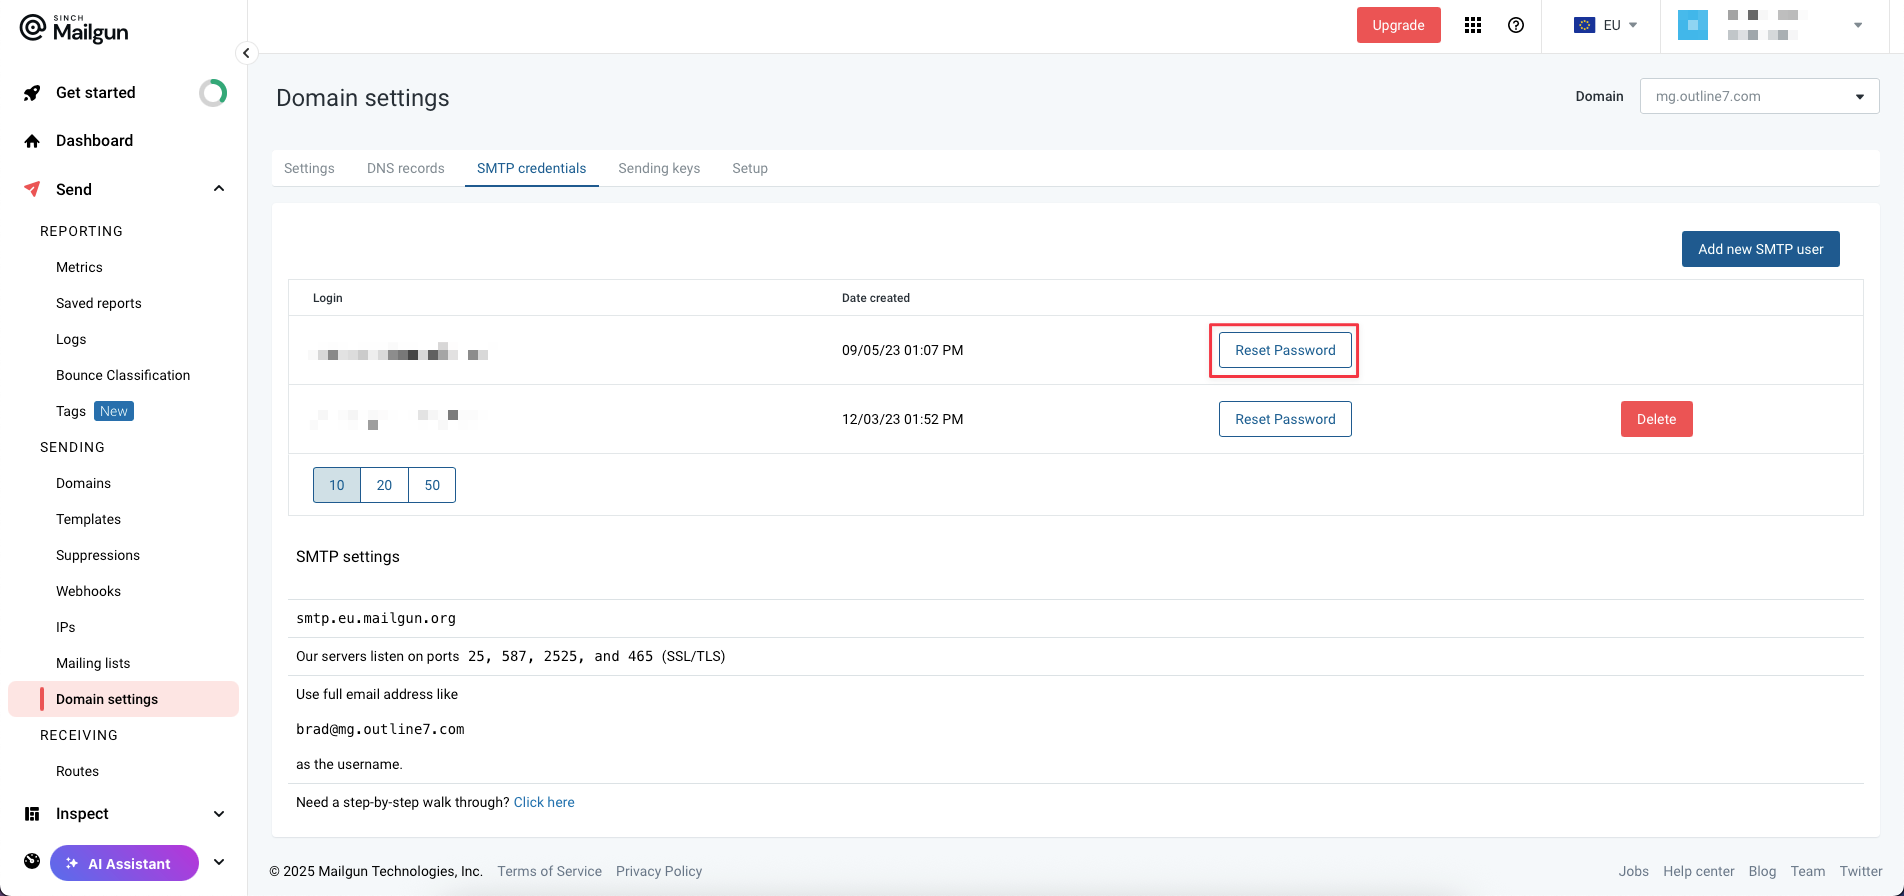
First, get the password from Mailgun. You get it by clicking on the "Reset Password" button.
The add it in the code snippet below where you see pass.
The next step is to add this code snippet to the config.production.json file. Be sure to change the host, user and pass accordingly.
"mail": {
    "transport": "SMTP",
    "options": {
      "service": "Mailgun",
      "host": "smtp.eu.mailgun.org",
      "port": 465,
      "secureConnection": true,
      "auth": {
        "user": "[email protected]",
        "pass": "The password from Mailgun"
      }
    }
  }
There are 2 ways to do this:
- Open CyberDuck (or another SFTP client). Download the file and edit it in Visual Studio Code. Then re-upload it in the same place and restart Ghost in the terminal.
- Do everything in the terminal. Run the
sudo nano /var/www/ghost/config.production.jsoncommand and edit the file. PressCtrl+Xand save the file. Then restart Ghost.
That's it, everything should work fine. Here's how the whole JSON file should look like (this is a sample, use your own file).
{
  "url": "https://domain.com",
  "server": {
    "port": 2372,
    "host": "127.0.0.1"
  },
  "database": {
    "client": "mysql",
    "connection": {
      "host": "127.0.0.1",
      "user": "user",
      "password": "user_pass",
      "database": "user_prod"
    }
  },
  "mail": {
    "transport": "SMTP",
    "options": {
      "service": "Mailgun",
      "host": "smtp.eu.mailgun.org",
      "port": 465,
      "secureConnection": true,
      "auth": {
        "user": "[email protected]",
        "pass": "The password from Mailgun"
      }
    }
  },
  "logging": {
    "transports": [
      "file",
      "stdout"
    ]
  },
  "process": "systemd",
  "paths": {
    "contentPath": "/var/www/ghost/content"
  },
  "headers": {
    "X-Frame-Options": null
  }
}
Summary
- To look professional, create a professional email address. I recommend Zoho, iCloud, Google or Microsoft.
- Mailgun is the 3rd party service of choice for Ghost. It works great.
- Carefully configure the
config.production.jsonfile, and you'll be good to go. Don't forget to restart Ghost after every change.